The notion of quality can be a complicated concept. Quality can be very situational and that very circumstantial nature of quality tends to happen at the horizon, where various aspects come together and meet. So let’s do a (very) deep dive into this with one of my favorite examples: game testing.
Quality in the Game Context
Previously I’ve talked about testing like a gamer and gaming like a tester. I’ve also talked about how exploratory testing is a critical skill in testing games particularly when it comes to attention to detail.
Quality is a shifting perception of value over time. Quality, or lack thereof, can certainly be very objective. But it can also be extremely subjective. This is particularly prevalent in games as the spectrum of perceptions can be so varied, involving game mechanics combined with auditory and visual cues. This is why understanding “bumping the lamp” is so important for testers in terms of engaging with design. It’s also why, as I’ve talked about before, testing games can be really hard.
Yet, as I’ve always maintained, learning how to test games is one way to build up skills as a very effective and efficient test specialist. In fact, it’s one of the driving reasons behind my Test Quest game, which I’ve used for interviewing test specialists.
Just as with non-game applications, there is a consistent need for testability. It’s a primary quality attribute and that attribute is predicated upon observability and reproducibility, both of which lead to predictability. (See my plea for testability if you want more of my thoughts on those ideas.)
In a game context, an extra quality attribute gets layered on to this, which is best described as playability. How hard or easy is the game? How engaging or boring is the story? How challenging or frustrating are the mechanics of the game? How well or poorly are those mechanics mapped to controller or keyboard+mouse configurations?
The Horizon of Testing
What I want to do here is take a particular game and show some of this in action. The game I’ll use is Horizon Zero Dawn: Complete Edition.

This is an open-world, post-apocalyptic, third-person action-adventure game. You play a female protagonist named Aloy who sets out to discover more about her world and her own personal past. There is a whole lot to like about this game and one of my favorite scenes comes early when Aloy first encounters a hologram:
This video might also give you a good look at some aspects of what I’ll be talking about in this post. As you can probably guess, this game is graphically heavy and any such game has some potential for issues when it comes to visual fidelity and performance. Those are qualities, to be sure, but they can get complicated in this context.
Specs for Quality
Games like this come out with a set of minimum specs and recommended specs. In this context “specs” refer to the CPU and GPU requirements considered necessary for having a certain type of quality experience with the game. So, first, let’s see what we had as far as specs go:
- Minimum GPU: GeForce GTX 780 or AMD Radeon R9 290
- Recommended GPU: GeForce GTX 1060 or Radeon RX 580 GPU
- Minimum CPU: Intel Core i5-2500K or AMD FX-6300
- Recommended CPU: Intel Core i7-4770K and AMD Ryzen 5 1500X
A challenge for testing in this context, however, is that it’s not just about the requirements. It’s about the various settings in the game that can impact those requirements. Horizon Zero Dawn, as with many such games, comes with many settings available that can be configured to deliver differing levels of quality and thus a differing experience.
Settings for Quality
The game settings came with certain presets. There are the “Ultimate Quality” presets:

There are presets that are set to “Favor Performance”:

There are presets that are set to “Favor Quality”:

And then were was the perhaps oddly named “Original”:
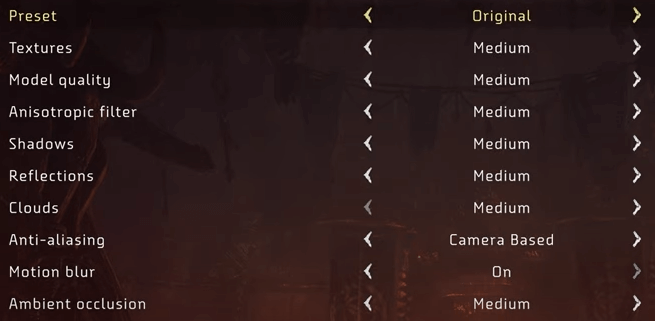
You would think the “original” would be called Medium Quality, perhaps, given the settings shown. However, these latter settings actually point to something important and were included as a result of testing.
The context here is that Horizon Zero Dawn had an initial release on console, as a PlayStation 4 exclusive, and then was ported to the PC. Thus the term “original” here represents the PlayStation 4 graphics settings. I’ll come back to this point a few times but, again, note that these were added in as a result of testing.
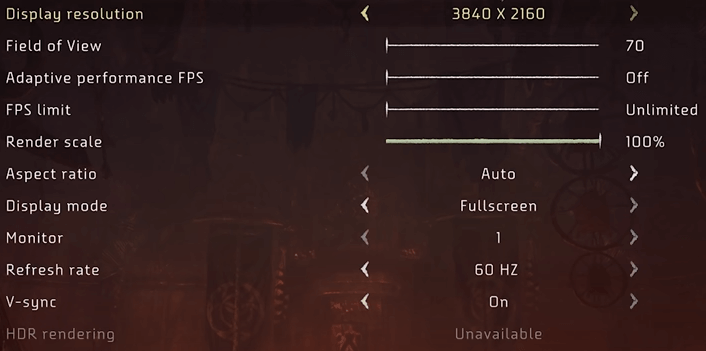
Finally, there are other settings you can consider as well beyond these presets:
Okay, so that’s a lot of stuff that can impact quality, particularly when you consider the varying CPU and GPU setups that are possible. And even then, you don’t know what else is competing for CPU or GPU resources on a given user’s machine as they are playing the game.
Situational Quality
A complication here is that each of these settings will not necessarily be a hard and fast requirement that could be framed as “good quality” versus “bad quality.” Instead there’s going to be a spectrum of experience and that spectrum is what you’re testing for as a game tester in this context. This testing relies on understanding those settings and their impacts on two particular qualities I’ve already mentioned: visual fidelity and performance.
I’ll note here my strong belief that it’s a misnomer to call performance a “non-functional requirement.” In fact, as I’ve argued, the phrase non-functional requirements is harmfully misleading and I believe the term non-functional has to be reframed.
Regardless of that, at least performance is something we can measure. What about visual fidelity? To a certain extent, we can measure that as well, of course. But the quality of “how something looks” can really depend on the person looking at it. Even performance can be a bit situational, since something that I find slow or sub-optimal may be just fine to someone else.
Quality For a Purpose
Let’s also keep in mind our outcome here: the player experience. We want our players to enjoy our game. That experience is, at least in part, mediated by the above settings that impact the CPU and GPU which determine how the game plays out. So let’s consider a visual here:

All that reflection, shadow, movement and wind — the latter two of which I realize you can’t see in action via a static image — can impact the frames per second that are possible. This, in turn, can impact the performance, i.e., how fluidly the scene renders, and thus impact the visual fidelity.
But note what we got there: an apparent way to bring some objectivity (frames per second) to our potentially subjective considerations of quality.
This is where, just as in all testing, you have to start learning the terminology of the domain you are testing. In games you have a frame rate and this is measured in frames per second or FPS. This value describes how smoothly a given game will run on a processor. The more frames you can pack into one second, the more smooth the motion will appear on screen.
A frame can sort of be thought of as a unit of time. Every frame the game engine will read input from the player, perform various calculations and render images to the screen. Keep in mind that you can have multiple of these frames being updated per second. So a game that runs at, say, 60 frames per second means one frame is 1/60th of a second, or roughly 17 milliseconds. The amount of frames the game runs at per second is the above-mentioned frame rate of the game.
It might be worth nothing that frame time and frame rate are essentially the same thing but are stated as an inverse of each other. If your game’s frame rate is 60 frames per seconds then your frame time is 16.66 milliseconds per frame. Speaking of frames …
Framing Our Testing
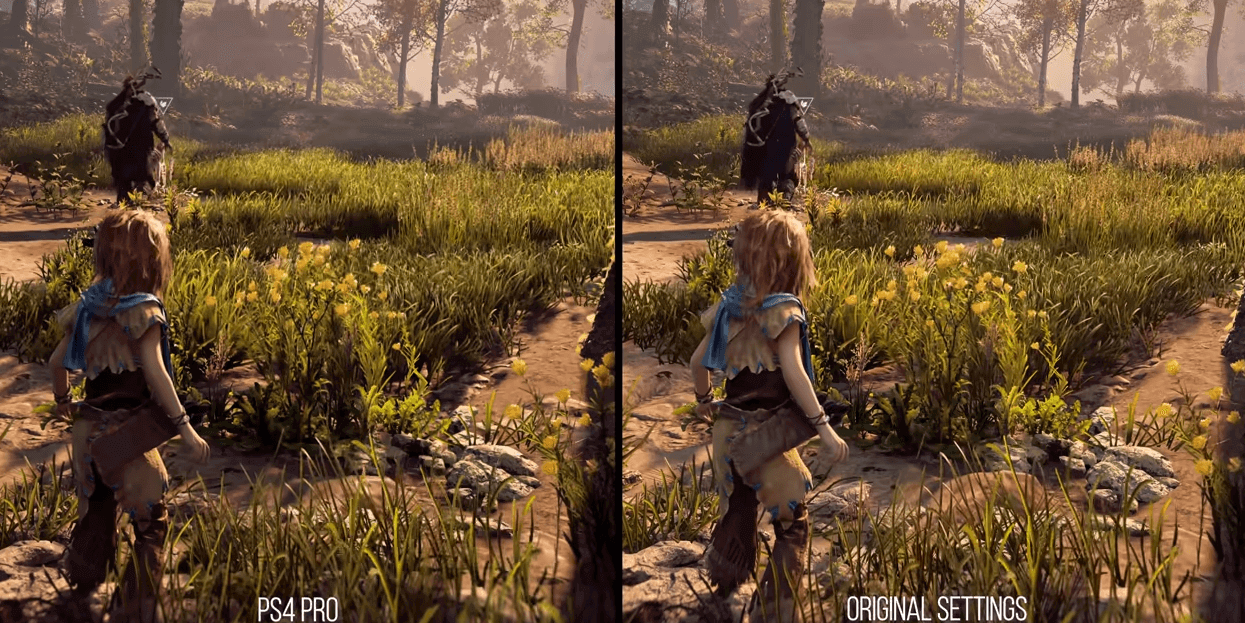
When you have a port of a game, as we do with Horizon Zero Dawn, you’ll often compare the new version to the port. Obviously here you would compare the new version (PC) with the original (PS4).
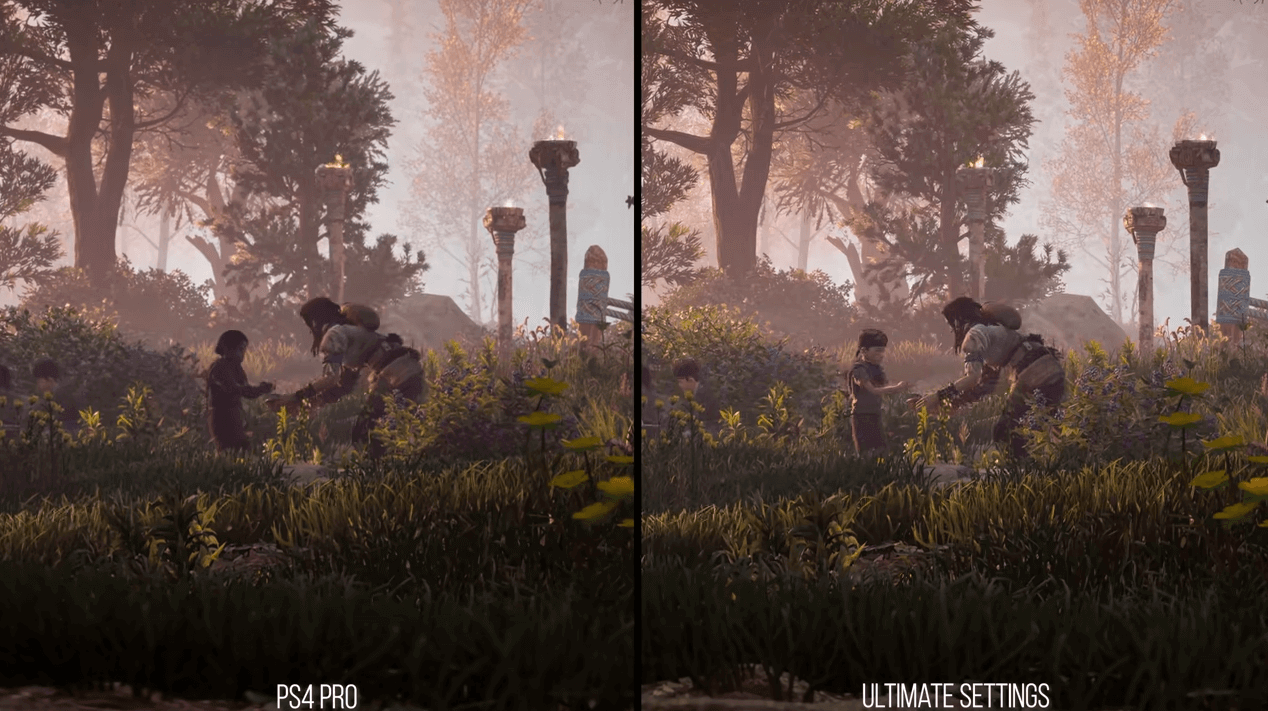
There I’m comparing the PS4 (remember: the “original” settings) with the ultimate settings on the PC. But there’s an assumption there, right? Do you see what that assumption is?
The assumption is that the “original settings” are truly like the PS4! So you might have to do some comparisons of that as well:
I bring this up only to make sure that you see “testing assumptions” is something you do in game testing just as much as you do in any other testing.
This comparison of PS4 to PC can be useful but it’s probably not all that useful for considering the vast majority of possible PC configurations. So, really, what you have to be thinking about is testing between various settings on the same type of PC. And then repeat those tests on different configurations of PC.
How well or to what extent all of that PC testing then matches up with the PS4 is really talking about a delta from the PS4. That can matter to a gamer who has both types of system and is deciding which to buy the game on but will matter not at all to someone who is only considering what kind of PC they need to play the game at a desired quality level.
I keep talking about these comparisons of settings and earlier I mentioned those specs, minimum and recommended. So this brings up a question: what PC machines are used to test? Clearly testing the minimum and recommended machine specs would seem to make sense. But you’ll want to consider a range of machines as well.
For example, you might keep the CPU in range of recommendation but scale up the GPU. So perhaps you’ll test on an i7-4790K CPU 4.00 GHz with 16GB RAM and a GeForce GTX TITAN Z. But you might also scale up both the CPU and the GPU, such as using an i9-1090K Turbo 5.2GHz with 16GB RAM and a GeForce RTX 3080 10GB GDDR6X. In both case, perhaps, your RAM will be DDR4/3000MHz Dual Channel Memory. And let’s say you might do all this with all PCs running on Windows 10, specifically with update 20H2 or greater.
I imagine you can see how difficult it can be to “test for quality” when there are so many settings and how those settings impact performance can change based on various elements of machine configuration some of which, like the Windows update version, may seem only peripherally related.
Some Test Tooling Can Help
While you won’t use as much automated tooling in game testing as you might in non-game testing — unless you get into tools called “orchestrators” — you will certainly have tooling available. In fact, you’ll want to make sure to have tooling that will allow you to observe. Examples are the RivaTuner Statistics Server, the MSI Afterburner and the TechPowerUp GPU-Z.
Here’s one example:
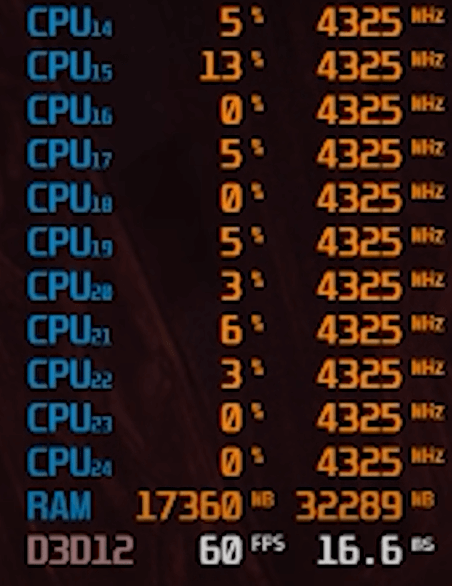
The above is a view which which shows CPU and RAM utilization, while also showing threads on the CPU. It also shows “D3D12” which refers to Direct3D 12, which in this case is the DirectX version that is really required for Horizon Zero Dawn to function well. Direct3D is the 3D graphics API at the heart of DirectX and DirectX is Microsoft’s API for handling graphics on Windows. (And there’s part of why your specific Windows version and specific update for that version can matter.)

The above is yet another view into the same thing, showing a focus on the VRAM being consumed along with the CPU utilization. VRAM (video RAM) is the dedicated memory that a GPU uses to store and access graphics data. Graphically heavy games will rely on VRAM that’s built into the graphics card so that the GPU can access the data much faster compared to when that data is stored on the computer’s memory or on a hard disk.
With your tooling in place, which gives you observability, then you can vary those settings I mentioned earlier and monitor gameplay via your tooling. This is a lot of what game testing is about when you are considering visuals and performance.
Tooling in Support of Testing
I want to show two examples of how this tooling support can help you in your testing by considering two interesting ways that observability was provided into how Horizon Zero Dawn was working.
Observe Your Test Tools’ Observability
As you can imagine when testing games for visual fidelity, you have to be able to see things with the human eye. Not terribly surprising. But this can include your tooling, which is not part of the game — but can be subject to the quality degrading elements that the game will also reflect. Here’s an example of what I mean:

Can you see that little bit of fuzziness on the left side compared to the right? This was an example from a Digital Foundry test for 4k execution. Why was the 4k (on the left) showing worse than the 1080p on the right?
Well, first, do you even know why that would matter? 4k and 1080p refer to the resolution of the display. So a 1080p display has 1920 horizontal pixels and 1080 vertical pixels, while a 4k display has 3840 horizontal pixels and 2160 vertical. Note the oddity there: 1080p refers to the number of vertical pixels (1080) but 4k refers to the number of horizontal pixels (3840).
The point here is that the 4k should have shown up better. What this testing led to was that the game would run at 4k initially, but then was downscaled to 1080p, and then, finally, upscaled back to 4k. How that manifested in the testing tool was that bit of fuzziness. So the impact on the test observability tool itself provided a good trail of evidence for a problem here.
Observability in Game Execution
Let’s consider another example:
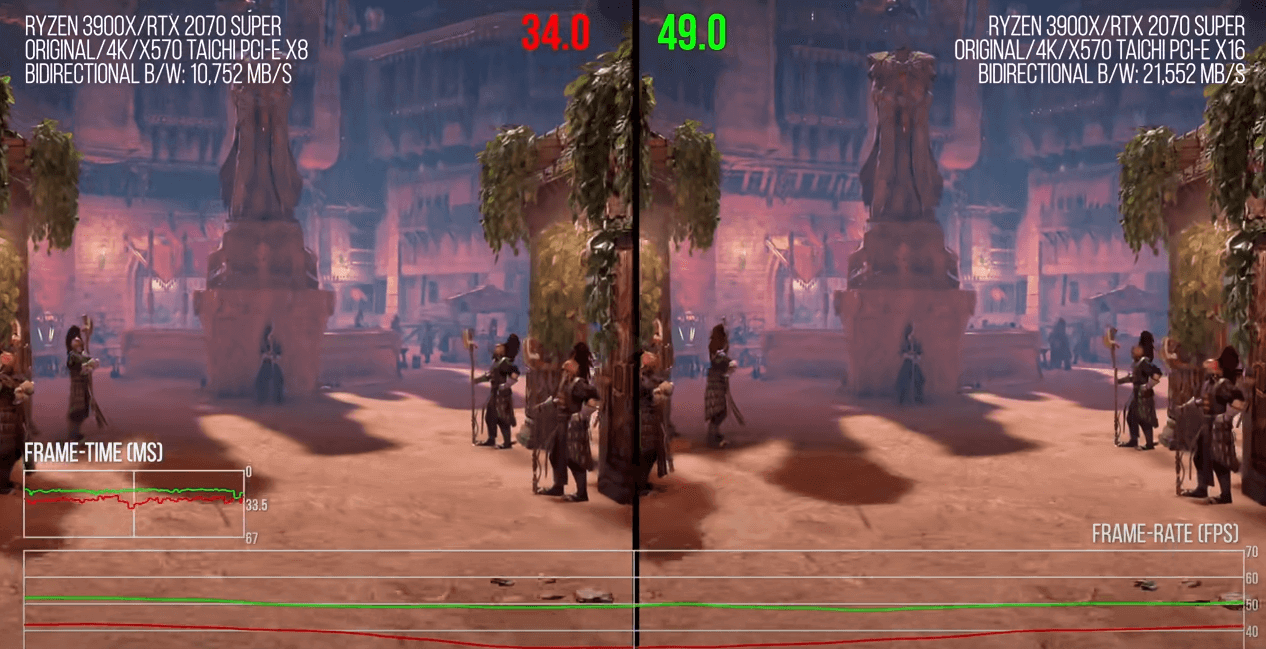
Notice above that we have an interface that can show the frame time and the frames per second.
It might be hard to see but notice the key difference of the test conditions there: on the left the PCI-e is in 8x mode while on the right it is in 16x mode. This is basically a test of the PCI-e bandwidth and its impact on the game. The frames per second are clearly differing and by a significant amount.
What this testing was showing was that something that the game was doing in the background with rendering required a lot of PCI-e bandwidth. This was actually a key finding of testing for this game on the PC: the game is communicating a lot over PCI-e and likely sharing memory and working off device memory too much. This appeared to be related to the polygonal procedural map generation the game was performing. Procedural generation is the programmatic generation of game content using a process that generates an unpredictable range of possible space values. In the context of maps, this indicates how aspects of terrain are generated.
This is done entirely on the GPU on a PlayStation 4. If translated directly to the PC, this means the GPU has to be constantly passing map data back over the PCI-e bus into main memory so the CPU can calculate collisions and other gameplay before the scene data is passed back to the GPU as terrain to be rendered. That extra back and forth communication was clearly having an impact on the PCI-e bus.
What that suggests is that users should make sure they use as many PCI-e lanes for their graphics card as they can. But ask yourself: how many gamers are necessarily going to be aware of this aspect of what might be impacting quality?
The Shape of Game Testing
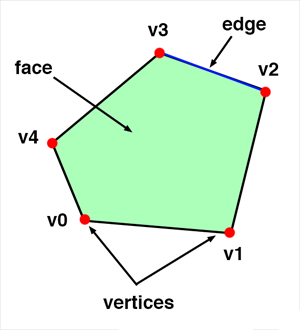
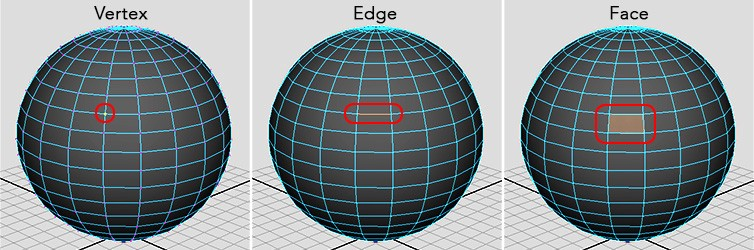
Previously I talked about the shape of testing and whether testing is geometry or topology. This actually plays out in a very real way with game testing of the sort I’m looking at in this post. For example, assets in a game, like static meshes, are made up of geometry:

A mesh, in this context, is a collection of vertices, edges, and faces that describe the shape of a 3D object. A static mesh refers to a mesh that doesn’t animate or morph or change in any way. These objects are essentially made up of bunches of little polygons. Those polygons have materials and textures applied to them.
So, from a testing perspective, all of those settings and all of what you look at, ultimately, reduces to geometry.

In 3D games the vast majority of the graphics you see are made up of a polygon mesh, which, again, are basically a collection of vertices, edges, and faces.
These are all brought together to form surfaces:
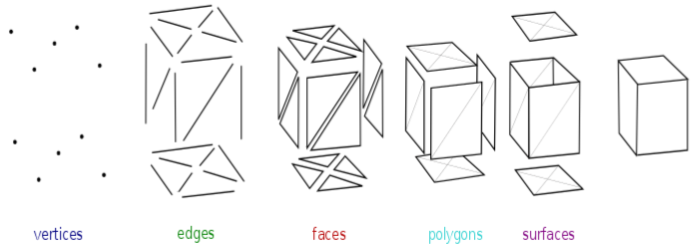
Dozens, hundreds, and thousands of these polygon meshes can be mapped onto an object and that forms a geometry and that geometry forms the model of an object.
From this you can bring those models together to form larger constructs:

And those are all, as you can see, made up of varying numbers of polygons. The more polygons you have, the more detailed the model can ultimately look. Things like shaders and textures are applied to these models that determine how complex the model looks and how the model reacts to light that is hitting it. Games can have dozens or hundreds of such models on the screen at a given time and this is what the graphical settings of the game will impact.
Does this truly matter, though, if you are testing the game versus developing it? Very much so. How you test the game will be indicative of how you “play it” and you will be playing it specifically to expose the game to high intensity situations, such as where there is a good chance of visual fidelity loss due to performance degradation. Knowing how to do that in a game is very much based on understanding where the game is most sensitive to conditions that cause that degradation.
The Test and Data Conditions
There are many settings to consider, as shown earlier, and those can all be considered data conditions to the overall test conditions. But, crucially, only a few of those settings may actually have large performance impacts. And then, even among those impactful settings, how many would have a further large impact on the game visuals?
The operating theory among many gamers is that we want our game settings to be the highest. After all, that’s the highest quality so presumably our game will look the best if we set things accordingly. Yet that can kill our performance. Yet if the differences in some fo those settings are negligible visually, then going for a lower setting may be worth it since it saves on performance.
“Negligible visually” can be objective but, obviously, there can be a huge subjective element to that.
The operating assumption of any such testing in this context is that game graphics can scale but not always in ways that are all that meaningful to the gamer experience. Which means the ability of a game developer to provide a quality experience is very nuanced and thus we are testing for that nuance.
This means that the qualities of visual fidelity and performance can be judged on a gradient. But some of that gradient will be entirely subjective. It’s going to depend on certain users and what they perceive to be “good enough quality.”
High-Tier Settings
Let’s talk about how we framed testing with a few of the most impactful settings. And how would you know they are the most impactful? Well, some of that just comes about with domain knowledge of how 3D games are made. But the rest of it would come about by testing!
I’ll note that some of this is going to be tricky to show you since I’ll be providing static images when, really, the quality (visual and performance) is showcased as the game is actually being played. You might want to try opening some of the images in a different tab as this will provide a larger image which can help showcase some of what I’m describing.
Setting: Reflections
Reflections in games tend to be expensive. The setting in this game controls the resolution of what’s called screen space reflections (SSR). Screen space reflection is a post-processing technique to mimic reflective surfaces like metal or water. The term “post-processing” there is a heuristic for game testers because it means algorithms are being run that change the perceived quality of a video at run-time, as it were, after the decoding process.
In this context, normal reflection processing require rendering the geometry twice and, as you can imagine, that can be a huge performance hit. Screen space reflections avoid that double-dip, if you will, via the post-processing effect that samples what’s called a depth buffer to calculate reflections.

The general reflection system in games works by capturing the static level at many points and re-projecting it onto simple shapes like spheres. Projecting the captured level onto simple shapes gives an approximate parallax for the reflection effects, which allows the reflection to “make sense” as the player moves around. Each pixel blends between multiple cubemaps to get the final result. In practice this changes the detail and sharpness of reflections.
A cubemap is a collection of six square textures that represent the reflections on an environment. These six squares form the faces of an imaginary cube that surrounds whatever object you are dealing with and each face of the cube represents the view along the directions of the world axes: up, down, left, right, forward and back. How this often works is you have a reflection algorithm that acts like a camera and it has a snapshot of its surroundings that is captured on a sphere.

The captured image is then stored as a cubemap that can be used by objects with reflective materials.

It’s really hard to describe this stuff in a way that does it justice. Essentially, screen space reflection uses another technique known as ray marching to determine the reflections. The idea being here that light (visualized as a ray beam) hits some object in the scene, like water, bounces off that object, and reflects back to the camera lens. Of course the light ray may not come directly back as it may bounce off other objects first.

I labored this a bit to show you why this is so computationally expensive. Regarding Horizon Zero Dawn, there aren’t actually a ton of places in the game that really utilize reflections, except for water. A notable exception might be the cave where you start the game:

In the above area, during testing, you can find that your frame rate will go anywhere from, say, 80 FPS (at a low reflection setting) to 70 FPS (at a high reflection setting). That can be pretty significant. So then it becomes a question of determining if you can tell the difference (from a quality visual perspective) between the settings. Here’s a few examples. See if there’s a “difference that makes a difference” to you.


This determination of quality from a visual standpoint is what your users will be making value judgments on. So what this just showed you is the performance quality and the visual fidelity quality and how they have to be considered together.
How do you help the gamer make this kind of decision, however, particularly in terms of deciding on minimum or recommended specifications for the game? Well, here it’s important to realize that most of Horizon Zero Dawn actually takes place outdoors. This means a lot of materials with a dull texture to them, such as trees, grass, dirt, and so forth. This means objects without a high reflectivity.

Whew! A lot of stuff, right? So basically SSR (remember: screen space reflections) is about allowing reflections to be subtle in terms of how they appear, such as when reflecting off water in a dark cave versus reflecting off water in a sunlit, open area.
The High setting in this game indicates reflections at their full resolution via the above calculations and algorithms. Going from High to Medium can save performance by about 15 percent. Going from High to Low can save performance by about 17 percent.
So, as a tester, we might determine that users should set reflections to Medium.
Setting: Clouds Quality
This might be a setting you don’t think about much because your eye is so much on the game landscape. But those clouds are always up there! And clouds can be computationally expensive.
The clouds setting basically adjusts the resolution of the game’s volumetric clouds. These kinds of systems use a three-dimensional volume texture that is ray-marched to represent layers of clouds in real-time. I mentioned ray-marching above in reflections so here I just add one bit, which is that ray-marching is a technique where the game engine calculates the distance to surfaces in a given level or scene.
Consider some visual differences here:


The Medium setting provides what’s called an “aliased” look, which basically means a little more “chunky” of an appearance. The more you scale up the resolution, the clouds fill out a bit more and thus you have less aliasing, which means more detail.
Going from Ultra to High will improve performance by about 26 percent. Going from Ultra to Medium will improve performance by 30 percent. The High setting here thus seems a good fit in that it removes some of the blockier elements but it doesn’t cost too much more. That said, if you had a gaming machine that was in serious need of more frames, Medium should be good enough from a visual perspective.
So, as a tester, we determine that users should set clouds to High.
Setting: Model Quality
The name for this setting can be a little confusing. The setting doesn’t strictly define the quality of models in the game levels but rather defines how far the game will render objects into the distance as well as the distance at which the game will begin rendering lower quality models. The idea is that models further away are rendered using models with fewer polygons, rather than the full quality versions, which have many more polygons. (Think back to our polygon discussion earlier.)
So, with this setting, you can increase the distances at which things render into the distance, which reduces pop-in, and increases the distance at which higher qualities of models are rendered. If you don’t know, “pop-in” refers to when objects just suddenly appear in front of the player rather than gradually appear as the player moves closer.
Let’s consider a visual:

You can certainly seem some difference there but, keep in mind, in the game you are usually moving around a bit so how much that “in the distance” visual fidelity loss matters is another one of those subjective things. Do note that many gamers do often pause in such games and look at the scenery, however.
The lower setting, as mentioned, can increase aliasing in the game and this can become more visible depending on what you are viewing. Consider this visual contrasted with the above:

Just as it was worth noting that the game doesn’t have as much focus on reflective surfaces, it’s also worth noting that this game does have a lot of distance views in it. So this setting will make the game look better, particularly when motion is involved (when the character is moving through an area). Yet it’s also a question worth considering from a subjective point of view: do you need the background scenery to look as good as possible when you’re really paying attention more to the foreground?
Well, let’s skip the subjective and consider more the objective performance. High and Ultra have really minimal differences. Medium and Low run about 6 and 7 percent better. Thus there’s really only about a 7 percent or so difference between Low and Ultra. Thus the performance penalty for this one is pretty small.
So, as a tester, we determine that users should set model quality to Ultra.
Our Testing So Far
So with our testing so far notice that we have determined a Medium, a High, and an Ultra setting.
We found those to be a nice sweet spot and none of those settings, taken together, were really covered by any of the presets that the game provides.
Mid-Tier Settings
The above settings were your biggies. Everything past this point becomes much less impactful although it can still help those who need to squeak out as much performance as they can.
Setting: Shadows Quality
This setting increases the resolution of, you guessed it, shadows.

Specifically it changes something called the shadow map cascade that is closest to the camera. It doesn’t change the range at which the shadow map cascades change. It also doesn’t increase the range at which shadows draw into the distance.
Okay, now what did I just say? A cascaded shadow map is a technique that fixes aliasing issues with shadows by providing higher resolution of the depth texture near the viewer (camera, in this case) and lower resolution further away. Yet in many contexts, it can be questionable how much this matters since the shadows are pretty much all close to the viewer:

Yet there’s something to note about shadows in terms of a gameplay aspect: this game has a lot of places to hide. In the opening tutorial, for example, the player is asked to hide in some bushes to avoid roving creatures. There are also a lot of trees in the game and a lot of giant creatures. These all cast distinct shadows and, even more to the point, distinct shadows that are visible at a distance. So this resolution makes sense to set as high as you can. Now, the difference is debatable:

Further, disabling shadows entirely actually doesn’t get you much more performance anyway. Yet it can make a difference visually:

Ultra basically has slightly crisper shadows. But High is probably more than good enough and you save up to 5 percent performance over Ultra. Even so, Medium doesn’t look all that bad. So notice how with this one, you have quite a bit of subjectiveness to what “quality” means or how much it matters since it does come down more to the subjective visual fidelity than to objective performance.
Setting: Textures Quality
Texture setting is subtle. This setting impacts something called the “LOD”, which is Level of Detail, but even more so, it impacts what’s called the LOD bias.
Games sometimes use what’s called a negative LOD bias to sharpen texture filtering. This sharpens a stationary image of a scene but introduces aliasing when the scene is in motion. Higher settings here mean textures will use their higher resolution mipmap versions further into the distance. Mipmapping is a technique for reducing the amount of computation needed to accurately texture map an image onto a polygon.
How much does this matter? Consider a comparison:
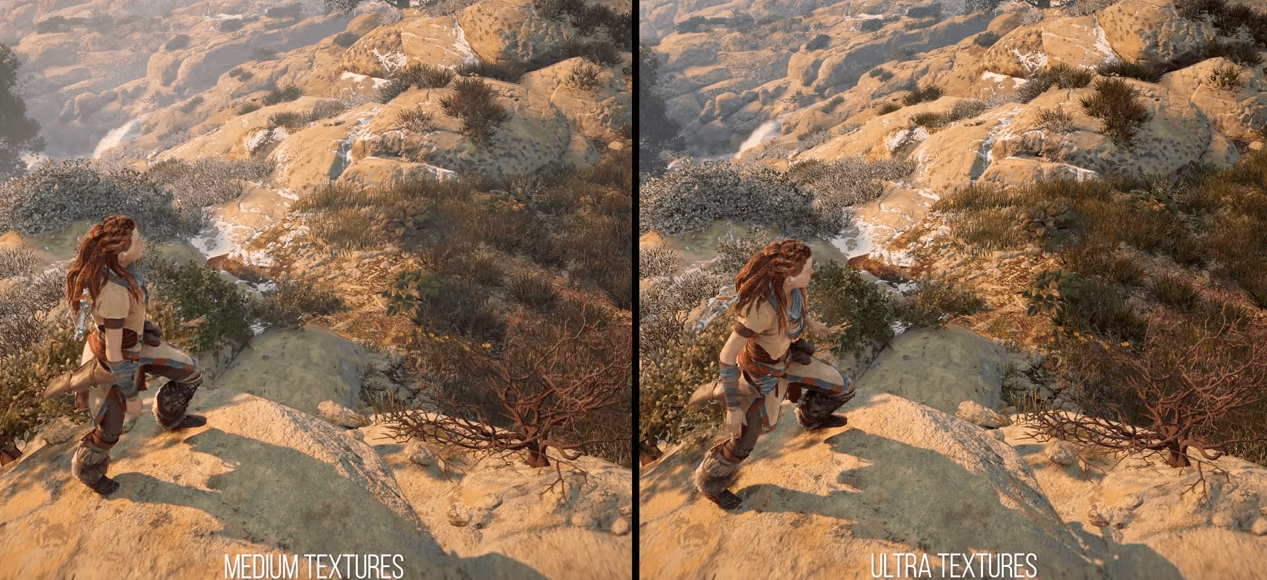
Obviously subjective in terms of how much the difference is, in fact, a difference.
Lower settings swap out lower version textures. Higher values means higher resolution, so textures should look clearer and sharper. Going to Ultra in this game is what adjusts the negative LOD bias. Ultra to Original will look very similar in the foreground, which you can see above. Differences start to appear further into the distance.
Interestingly, most of the setting values will all use the same amount of VRAM and thus will tend to have the same performance but VRAM usage will change most depending on where you are in the game. Low uses about 1.5 GB less VRAM on average and has a small increase in performance (about 2 percent).
This is very subjective: how far do you, as a game player, like your objects in the distance to look in terms of sharpness?
The Original setting (Medium) is likely fine here for most uses.
Setting: Anisotropic Filter Quality
This setting also impacts textures but here it impacts the quality of textures at oblique angles to the camera. So, basically, anisotropic filtering is a texture filtering technique that tries to improve the quality of textures that are seen at an angle. In case you’re wondering about the word “anisotropic”, “an” means not, “iso” means same, and “tropic” is based on tropism, meaning related to direction. Thus the name is meant to indicate that the filtering is not performed in the same way (“not same”) in every direction.
There is little to no perceptible difference between Low and Ultra.

This might seem a little interesting. So I’ll bring up something here that I won’t be able to dig into too much. You can force your graphics driver (usually via its control panel) to force a setting of 16x for anisotropic filtering. If you do that with this game, you can see a difference:

Ground and rock textures will tend to be a little clearer, with generally greater definition to them. Performance impact seems negligible: with forced, you get about a 1 to 2 percent FPS decrease. Not terrible, unless you already have frame rate problems from other settings and you’re in a situation where every frame helps. Of note, however, doing this forced setting approach can give you some bad texture corruption problems:

The game itself does a recompiling of shaders when it starts up and if this doesn’t happen, you’ll see artifacts like the above happen in the game.
Yet something is interesting in that you might really see no difference in anisotropic filtering levels between the settings on a wider scale, such as how you general view the world around you.

In fact, testing along these lines reveals that this setting actually seems to be broken in the game.
Setting: Anti-aliasing Quality
I’ve mentioned “aliasing” a few times in this post. Aliasing is an artifact that is apparent as jagged edges. Anti-aliasing mitigates what are called “sawtooth lines,” making them appear a bit smoother. There is a lot of movement in this game, lots of grass moving in the wind, lots of leaves blowing around. The character’s hair moves with the wind.
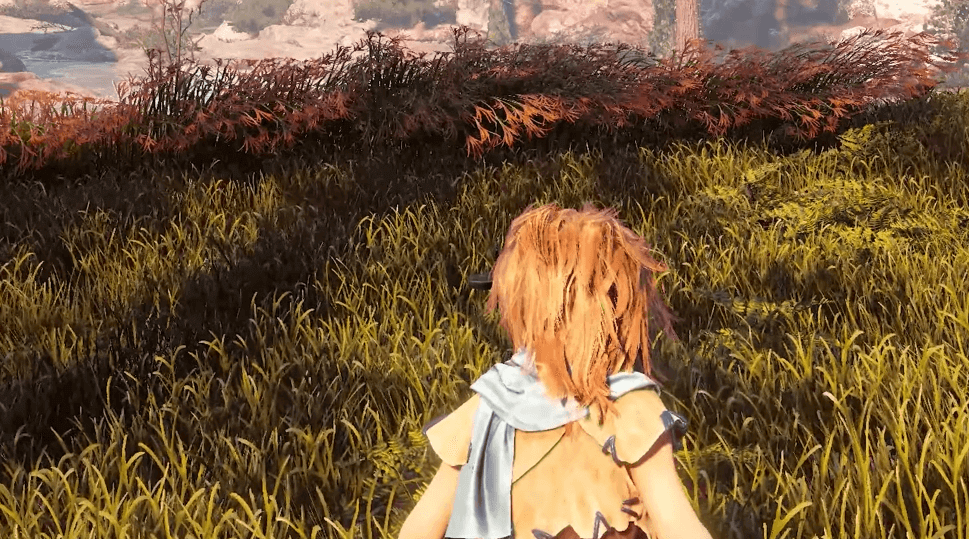
You can’t obviously see all the movement from that image but trust me: just about everything in that image is moving to some extent. If you watched the video earlier, you can see the level of movement that takes place just with Aloy’s eyes and hair.
There are various options for this setting. One is called “camera-based” and this dynamically adjusts the anti-aliasing method for the best visual quality. There’s also FXAA, SMAA, and TAA. But what is all that? FXAA refers to Fast Approximate Anti-Aliasing. This technique, which doesn’t use a lot of processing power, takes the rendered scene and uses an algorithm to detect which parts of the screen need to be smoothed. FXAA will detect edges where jagged edges might occur and smoothes the edges with approximate color, the effect thus being a smoother edge. A problem however is that since there isn’t a lot of graphics processing (relatively speaking) with this technique, FXAA causes a lot of overall blur and smudging to achieve a smoother edge. SMAA refers to Subpixel Morphological Anti-Aliasing. This technique similarly detects edges and applies filtering to get a smooth edge. It uses a more comprehensive algorithm for better detecting edge patterns and uses more GPU processing to get the results. So better quality than FXAA but at the cost of greater processing. TAA refers to Temporal Anti-Aliasing. As the name implies, this technique uses time to help smooth out edges. The algorithm looks at previous rendered frames in a buffer to determine edges rather than just analyzing the pixels of a single image. The algorithm then applies similar anti-aliasing techniques to those edges it detects. Since this is looking at frames, you can imagine that your frame rate is crucial to this technique.

The general idea is that anything other than the TAA setting can make the screen a bit jaggy as everything moves, potentially even showing some screen tearing, which is a disparity between frames as multiple frames are being shown at the same time.
You can see an example here of how this impacts individual elements:


It’s also worth noting that at higher resolutions, the need for anti-aliasing is reduced. We haven’t talked much about the resolution of the game for these tests. Here I’ll just note that a greater resolution means a greater number of pixels which can allow for a lot more smoothing than at lower resolutions.

Setting: Ambient Occlusion Quality
Ambient lighting simulates real-world global illumination. Ambient occlusion simulates the shadows caused by objects or parts of objects blocking that illumination. It essentially adds depth and makes objects seem more realistically situated in the game world. This game uses screen space ambient occlusion (SSAO) which is a technique for efficiently approximating the ambient occlusion effect in real time.
This can be really tricky for people to discern in a lot of cases:

An interesting test finding with Horizon Zero Dawn is that going from Medium to Ultra makes the SSAO effect more transparent and weaker. It seems to make the lighting more “accurate” but it seems that the game’s indirect lighting intensity was not designed around such a weak ambient darkening. This means in Ultra mode, object and character models in shadow will tend to show more than they probably should.

Do you see it? It’s subtle when viewing a wide amount of graphics like that. Here notice the uncovered arm of the woman holding the dish and her belt. Here’s the original setting (Medium) for ambient occlusion:

And here’s the same thing with Ultra:

You can see how the belt, which should be in shadow due to her arm, is more lighted.
So: again, another bug was found in how the game was apparently utilizing one of its settings.
Medium seems to be best in this context as you save 3 percent more performance over Ultra and High.
Setting: Adaptive Performance Quality
There is an adaptive performance option, which lets you set a target frame rate. This ties in with the FPS limiter that is also available. The idea of adaptive performance is much like what it sounds like: it allows the game to change (adapt) its resolution on the fly to achieve a given frame rate. And the frame rate you want to achieve is indicated by setting the FPS limit.
Here’s a scene in Ultra running in 4k:

Note that it’s running a bit under 60 frames per second. The GPU is at about full utilization. Look at the top green numbers.

It’s hard to see but that GPU is at 94 percent. It’s pretty much getting maxed out.
Now turn on adaptive performance scaling.

The GPU utilization drops considerably:

The GPU there is at about 69 percent and yet the frame rate goes up to 60.
So our frame rate is going up but our GPU utilization is going down. This is actually counter-intuitive and is different from how other such games handle this. I say that because when you set the limit specifically to 60 frames per second, you see an average of 57 frames per second:
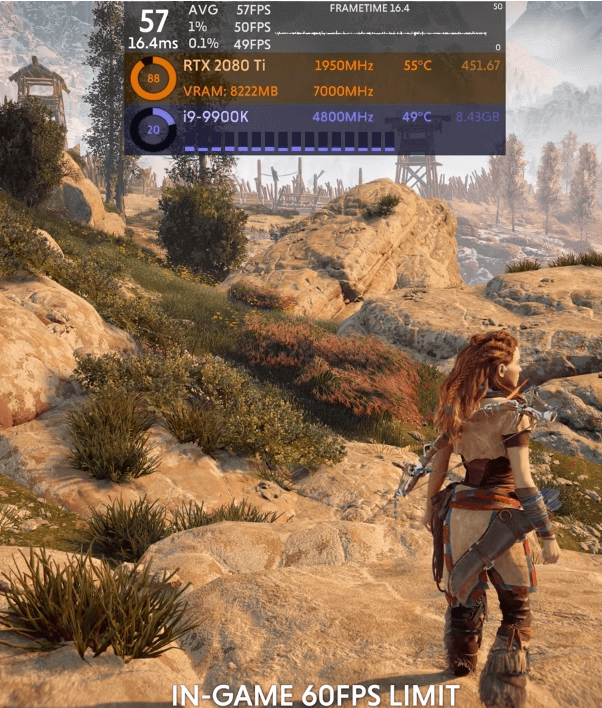
So if I set a limit, that limit isn’t actually reached. Yet if set the FPS limiter to unlimited, that actually seems to allow the game to provide much smoother frame rates than trying to use the limiter. There’s something about setting the limit that doesn’t quite seem to make sense in terms of how the game engine is respecting the setting.
It would be difficult to take you through the full path of testing on this topic but I will say that the above observation was linked with another one.
The frame time was periodically observed to drop to 33 milliseconds or 40 milliseconds once every 300 frames. In fact, you could see stutters in excess of 40, 70, or even 100 milliseconds. This happened even though the GPU was not being saturated, as was the case above. You could lower the resolution down to 90 percent of 4k or 1080p, 80 percent of 4k or 1080p, and so on. And you will see the frame rate go up, as you would expect. Yet the problems of stuttering would persist.
The testing was suggesting that the game was GPU bound in an odd way.
I say “odd way” because if you’re not being limited by frame-rate limiters and the GPU is not saturated, then you are being bottle-necked by some other system component other than the GPU. This would generally imply the CPU. But the CPU, in these tests, didn’t seem to be overtaxed.
One thing you might do to isolate what’s going on here is to change the render scale. Horizon Zero Dawn does provide a render scale setting that you can set to either 50 or 100. But this seemed to have little effect as can perhaps be seen here:

Another thing you might use to isolate what’s going is changing the field of view. A field of view is a measure of how much of the observable game world is seen on the screen at any given moment. The higher the field of view, the more polygons are on the screen, thus the more objects to render and illuminate. Horizon Zero Dawn provides a setting for this. The setting in the game is limited to values of 70, 80, 90, or 100. With a setting of 100 or 90, you pretty much get identical performance in terms of frames per second. At 80, you get a 2 percent performance gain and at 70 you get about a 6 percent performance gain. Thus there’s not a great disparity here. (Although this is good news for those who like a greater field of view.)
So what the testing is showing us is that the GPU won’t necessarily give you performance scaling in these contexts and yet, as stated, with a lot of testing it was found that the CPU was not limiting the performance.
All of this ended up being the PCI-e issue that I brought up much earlier. Going from 8x to 16x would make just about all of those stutters entirely disappear. So what I just walked you through here was a bit more of how that aspect of the game’s performance impactors was determined. Along the way, this allowed us to test a few other settings.
And it’s worth noting again that this PCI-e setting is not in any way one of the settings you can control via the game.
Setting: Display Resolution
One thing I’ve barely talked about here is the resolution of the game. Resolution can have an outsized massive impact. Consider:

The left-most image, which is in 4k, is 100% of the baseline. Jumping down to 1440 gives an increases performance by 54 percent. Jumping down to 1080 increases (almost doubles) performance by 93 percent. Further, compared to 1440, the 1080 resolution delivers a 25 percent improvement to frame rates
Testing along resolutions shows there is about a 40 percent overall difference between Ultimate settings and Favor Performance settings.
What Did Testing Tell Us?
A real good test strategy for Horizon Zero Dawn turned out to be setting the game to the original settings. This was, after all, what the game originally was designed to run at. This is actually really handy as it sets the baseline for visuals and performance.
In fact, as I mentioned earlier, this kind of testing is part of why the Original settings were made as a preset.
Now, the strategy I just mentioned is important because it runs counter to what many gamers will do, or at least want to do, when they attempt to play such games. The operating theory is always that we want the settings to be the highest, right? After all, that’s the highest quality so presumably our game will look the best.
A lot of games have auto-detect mechanisms that will attempt to determine what your PC is capable of rendering and establish the settings of the game appropriately. But this rarely has the nuance that gamers want.
Notice, however, that our test strategy, in order to inform us about the actual possible range of user experiences, had to play against the notion of how most gamers would approach the game we were testing.
With this strategy in mind, we can now compare the original (which, remember, was the PS4) with the various settings:

That gives us the basis to then check those same settings with the PC versus the console, under the assumption that the “Original Quality” settings can stand in for the console.
Thus beyond that PCI-e issue I talked about, what players should be told to do to maximize the game performance is this: start with Original settings and tweak up.
This would be as opposed to starting with Ultimate settings and tweaking down. The benefit here is that you give users a baseline (“original”, “medium”) that was considered solid enough on the console. But you allow that to scale up for PCs which tend to have more options but also a lot more variability around the options in terms of the effects.
So what we end up with, as some potentially “optimal settings”, are tiny nudges above the Original settings:
- Textures: Medium
- Model Quality: Ultra
- Anisotropic Filter: Medium (maybe with driver-enforced 16x)
- Shadows: High
- Reflections: Medium
- Clouds: High
- Anti-aliasing: TAA
- Ambient Occlusion: Medium
- Adaptive Performance: Off
What this does is give us a baseline to test from. Why? Because we’ve optimized for resolution and frame rate. But that means this is also a good baseline for gamers to start from since it makes the fewest possible assumptions about their specific PC.
This also mitigates some of the bugs that are still clearly present in terms of how some settings work and it mitigates against the PCI-e issue.
Thus the testing strategy does in fact end up aligning with the desire of gamers to have as good as possible of a player experience. With all of this, however, I would remind you that all of this — and it was a lot, and nowhere near as in-depth as I could have gone — are just a few aspects of quality.
Consider the video I provided at the start of this post, regarding Aloy’s first encounter with a hologram. I think that is one of the most beautiful and endearing scenes I’ve seen in a game. It’s a wonderful scene that does so much to build the character of the young protagonist.
Granted, a clumsy scene would be a clumsy scene no matter what but I think it’s worth recognizing that the narrative quality of that scene is partly impactful because it does so much rely on the graphic performance and visual fidelity that I talked about here to render some of that impact.
The Long Road Taken …
I hope this post gave you at least some insight into game testing and some of the challenges around it. This was a long journey, to be sure, but I wanted to treat it at least somewhat with the depth it deserved.
Until next time, happy gaming … and testing!
