The previous post covered the concept of Ollama, to get a local LLM on your machine. Here, I’ll focus on using that LLM and introduce two key properties of testability in this context. Doing so will introduce LangChain.

In this post, and in subsequent ones, I’m going to be relying on Python. In order to keep this series focused, I’m going to have to assume you can get a Python 3 version installed on your machine and you are able to use the built in package manager called pip.
As I mentioned in the first post, creating a virtual environment is a near necessity for Python. To make things a bit easier, we’ll just create an environment without the aid of tool help and I won’t assume a whole lot about your local Python ecosystem.
Revisiting Models
Before we get into that, let’s revisit the model concept we talked about in the previous post. Qwen3 (the one we downloaded) has a special “thinking” feature built into the model itself. This was the chain-of-thought I mentioned. This is a newer capability where the model generates internal reasoning tokens before producing the final answer. Qwen2.5 (the previous generation) doesn’t have this built-in thinking feature. It just generates answers directly without the internal monologue overhead.
Okay, great, so “more thinking” is better, right? In theory, yes. In practice, you might find that some of the logic in this post, simple as you will find it to be, taxes your processing power. If that’s the case, I recommend downloading Qwen2.5 and having it ready.
ollama run qwen2.5
Another good choice to try might be the Phi model from Microsoft.
ollama run phi3
Yet another good choice might be LLama from Meta.
ollama run llama3
Keep in mind that you can download as many models as you want, as long as you have the storage for them.
From a development, and a testing, standpoint, having more models available is sort of like having more browsers available during web testing or more device options available during mobile testing.
If you do use a different model, all you have to do is change what model name is being used in any of the scripts I show you. This is something I can’t plan ahead for you because I don’t know the particulars of your machine and what it can handle.
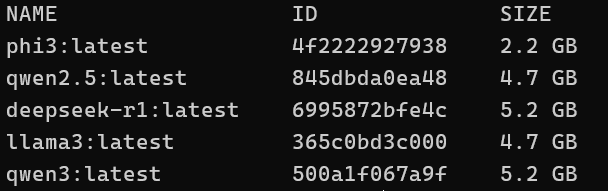
Generally, when learning, I recommend you have a variety of models installed and find what you can reliably use. For what it’s worth, here is what I currently have when I run ollama list:
Getting Started
To get started, create a project directory where you want to work. Then create a Python virtual environment within that directory.
python -m venv .venv
You can name your virtual environment whatever you want, but .venv is considered the standard and IDEs will tend to look for that first. To activate this virtual environment, you can do this on a POSIX system:
source .venv/bin/activate
On Windows, do this:
.\.venv\Scripts\activate
To get out of the virtual environment, you can do this:
deactivate
You’ll want to make sure you’re in your virtual environment any time you start coding in this directory. On most operating systems, your command prompt will show you that you are in it. Let’s now install our initial dependencies for this project.
python -m pip install langchain langchain-ollama
If you’re not familiar with Python, what we basically did is use pip to install some project dependencies but we did so only in the virtual environment and not in your global Python package space. Thus, everything we do is self-contained and will not impact anything else on your system.
At the time of writing, this will get you langchain 1.2.0 and langchain-ollama 1.0.1. These projects can introduce breaking changes between major versions but are, for the most part, pretty stable.
Here, langchain is the core framework designed to help developers build applications powered by LLMs. The langchain-ollama integration package does what it sounds like: it connects the LangChain framework with Ollama.
Introducing LangChain
Let’s dig a little deeper into LangChain just so we can orient ourselves around the technology we’re using.
LangChain is best thought of as a coordination layer for language models. While tools like Ollama focus on running a model, LangChain focuses on using one as part of a larger process. A way to think of this is that LangChain provides the connective tissue that lets an LLM interact with prompts, memory, documents, tools, and application logic in a structured way. Instead of treating a model call as a single question-and-answer exchange, LangChain treats it as one step in a chain of reasoning or action.
What LangChain really offers is a way to turn language models into participants in workflows rather than isolated responders. It gives developers a vocabulary for ideas like “remember this,” “retrieve relevant context,” “call a tool,” or “decide what to do next.” In doing so, it shifts the mental model from prompting to orchestration. By that I mean, you’re no longer just asking a model for text. Instead, you’re designing how it thinks, what it can access, and how it moves from input to output.
I bet that sounds like a whole lot of stuff that you would want to be able to test! Eventually, in this series, I will introduce tools that do exactly that. But I also want to show you what goes into building these applications. To test AI, it really helps to know how the sausage is made, as it were.
One way I like to think of it is that Ollama makes models local, LangChain makes them purposeful. Together, they let you run a model you control, give that model context and memory, and embed that model into small, testable applications.
Our First Script!
Within the project directory you set up with your virtual environment, create a script.py file (name it whatever you want) and within that you can put the following code:
|
1 2 3 4 5 6 7 8 9 10 11 12 13 14 15 16 17 |
from langchain_ollama import ChatOllama MODEL = "qwen3:latest" model = ChatOllama( model=MODEL, base_url="http://localhost:11434", temperature=0.2, top_k=25 ) prompt = "What is the speed of light in a vacuum?" response = model.invoke(prompt) print(type(response)) print(response) |
This logic depends on you having followed the first post, which involved getting the Ollama app on your machine and running, as well as downloading the qwen3 model.
Per my model revisit above, if you chose another model, you can easily just replace the name of the model in the code by changing the MODEL constant.
Here, the ChatOllama that we’re using is a LangChain integration that allows you to run and interact with open-source LLMs, like the qwen3 model we’re using. While ChatOllama is designed to work with chat messages (hence the “chat” in the name!), you can also invoke it with simple text strings as we’re doing here. Behind the scenes, LangChain converts that simple string into a message format that the chat model expects. I’ll revisit this string/message distinction later in the post.
Try and run your script.
python script.py
Depending on your processor and your GPU, execution can take a variable amount of time. In fact, it’s right here, at the beginning, that I would experiment a bit with models. In these initial posts, the specific output from a specific model is going to matter less than simply understanding what you are doing with these models. That said, do keep in mind that initial model start up time is always longer than regular operation. I’ll come back to this in a bit when I talk about “keep alive” settings.
Once the script does finish, you’ll get some output like this:
<class 'langchain_core.messages.ai.AIMessage'>
content="The speed of light in a vacuum is a fundamental physical constant. Its exact value is **299,792,458 meters per second (m/s)**. This value is precisely defined and ...."
Remember that LLMs are probabilistic in terms of output, so you should not expect to see the exact same output as I’m showing you, even if you’re using the same model.
You can see that the type of the response you get is of AIMessage and this is one of the types in LangChains’s Messages system.
If you dig into the output, however, you’ll find that the response we got back contains more than just the output text, which is stored in the content key. It also includes metadata about the model’s response. For example, you’ll see something like this:
response_metadata={'model': 'qwen3:latest', 'created_at': '2026-01-04T11:47:29.3641445Z', 'done': True, 'done_reason': 'stop', 'total_duration': 110821375500, 'load_duration': 104361231100, 'prompt_eval_count': 20, 'prompt_eval_duration': 232754100, 'eval_count': 659, 'eval_duration': 6099795700, 'logprobs': None, 'model_name': 'qwen3:latest', 'model_provider': 'ollama'} id='lc_run--019b88d3-bd03-7df0-b7c8-0202f7ee605e-0' tool_calls=[] invalid_tool_calls=[] usage_metadata={'input_tokens': 20, 'output_tokens': 659, 'total_tokens': 679}
Let’s consider some of these values.
- load_duration (104,361,231,100 nanoseconds = ~104.4 seconds): This is how long it took to load the AI model into your computer’s memory before it could start working. In my case, it took about 104 seconds to get the model ready. This only happens when the model isn’t already loaded. (This was on my slower laptop. On my faster PC, this value was 466,346,083 nanoseconds = ~0.47 seconds.)
- prompt_eval_count (20 tokens): This is the number of “pieces” (tokens) the question was broken into. The prompt “What is the speed of light in a vacuum?” was split into 20 tokens. Tokens are like words or parts of words that the AI uses to understand text.
- prompt_eval_duration (232,754,100 nanoseconds = ~0.23 seconds): This is how long the AI spent reading and understanding the question. It took about 0.23 seconds for the AI to process all 20 tokens of the prompt.
- eval_count (659 tokens): This is the number of tokens (pieces) in the AI’s response. The AI generated 659 tokens to answer the question. Clearly more complex answers will have more tokens.
- eval_duration (6,099,795,700 nanoseconds = ~6.1 seconds): This is how long it took the AI to generate the entire response. It spent about 6.1 seconds creating all 659 tokens of the answer. This is the “thinking and writing” time.
What to take from this is that you’re getting a lot of information about what the model is doing as it operates.
This Matters for Testing!
With this metadata, we can do performance benchmarking. You can compare how fast different models answer the same question. You can also help with cost and resource planning. The metrics like total_duration, load_duration, and eval_duration show how much computing time is needed. If you’re running this on your own computer or paying for cloud servers, longer processing times mean more electricity/server costs per request. These metrics let you quantify exactly how much time (and therefore cost) each model requires.
You can also use this data to understand token economics. My prompt_eval_count (20) compared to my eval_count (659) shows the model generated about 33x more output than input. If you’re using a paid API, you often pay per token and this helps you estimate costs. This ultimately starts to get into quality and speed trade-offs. Sometimes faster models give worse answers, slower ones give better answers. The metadata lets you measure the speed side of that equation. You can test: “Does Model X give good answers even though it’s 3x faster?”
You can also identify bottlenecks. Breaking down load_duration versus prompt_eval_duration versus eval_duration shows where time is spent. This allows you to ask if the model is slow to load. Or if the model is slow to understand questions. Or if the model is slow to generate answers. I trust it’s obvious that this information helps diagnose problems and optimize your setup.
A key point here is that when testing AI models, you care about more than just “is the answer correct?” You also need to know “how fast?”, “how expensive?”, and “how efficient?” These are various qualities, both internal and external, that you have to consider. This metadata gives you the numbers to answer those questions objectively and consider what qualities may be amplified or degraded.
I talk about the distinction around internal and external qualities in my navigating qualities post. That happens to be in a gaming context. I also talk about the idea of multiple qualities when I described my role as a specialist.
Testability!
Let’s also note that this script gives you controllability. That’s one of the key quality attributes of testability. Granted, with this particular script we’re not doing too much more than what someone would do if they went to any LLM interface and typed in a prompt.
However, what I trust is obvious here is that we’ve made this programmatic and that is what gives us a measure of control. As two examples, in the first post, I talked about how the default temperature for Qwen3 was 0.6 and the Top K was 20. Here, I’m showing you how you can override those values, should you want to.
I should note that those changes would have very little, if any, impact on the output and thus really weren’t needed. I just did that to show you how you could override certain model settings if you want to. In fact, I will not use those overrides as we go forward. This will also more easily help you use different models for your scripts.
Starting Up Models
One thing I want to call out is that Ollama keeps models in memory based on a configurable timeout setting. The default timeout is five minutes of inactivity. After the timeout expires without any requests, Ollama unloads the model from memory to free up resources. The next request will require reloading, causing that ~104 second load_duration you saw from my output. That, of course, was as function of memory. On my much beefier PC, the time was drastically less.
The main takeaway here is that if you run another request within five minutes, you’ll see load_duration drop to nearly zero because the model is still in memory. You can see what models are currently operating by running this:
ollama ps
You might see the following for example, after you just run a prompt against Qwen3:

You can change this timeout by setting an OLLAMA_KEEP_ALIVE environment variable (documented a bit here). Examples of this:
- OLLAMA_KEEP_ALIVE=10m
- OLLAMA_KEEP_ALIVE=1h
You can set the value to -1 and that means the model will be kept in memory indefinitely or, rather, until Ollama stops or the system restarts. You can also set the value to 0 and that means unload immediately after each request. If you change the environment setting while your Ollama service is running, just make sure to restart it so it picks up the new setting.
You can also provide this setting programmatically if you prefer that over the environment variable. Here’s an example:
|
1 2 3 4 5 6 7 |
model = ChatOllama( base_url="http://localhost:11434", model="qwen3:latest", temperature=0.2, top_k=25, keep_alive=3600 ) |
If you go the programmatic route, I find you have to use a raw number of seconds, like 3600, as opposed to one of the string values like “1hr”. When I did the above, I now see this:

If you’re actively developing/testing, you can set this value to -1 or a longer duration to avoid waiting for reloads. If you’re concerned about RAM usage and only use the model occasionally, keep the default. Your system RAM is really the limiting factor here. If you run out of memory, your operating system will start swapping and everything slows down.
Do note that if you do switch models between executions and you use one of the keep alive settings, then each model will stay in memory for the keep alive time. You can manually stop models that you have started. For example, you can do this:
ollama stop qwen3
If I know I’m going to be playing around a bit with a consistent model, I will usually go the programmatic approach and put the keep alive in my code on my slower laptop. With my faster PC, I don’t bother.
Tracing with LangSmith
For this next part, let’s add another testability attribute. Go to LangSmith and sign up for an account. I recommend using your GitHub, if you have one, to sign up. It’s all free.
They update their UI here and there so I’m reluctant to give too many screenshots or too explicit of directions but you’ll want to click on “Get Started with Tracing” or something along those lines. You’ll want to do this for the LangChain integration. Here’s what you’ll see as of right now:
And when you click into that, you’ll see something like this:
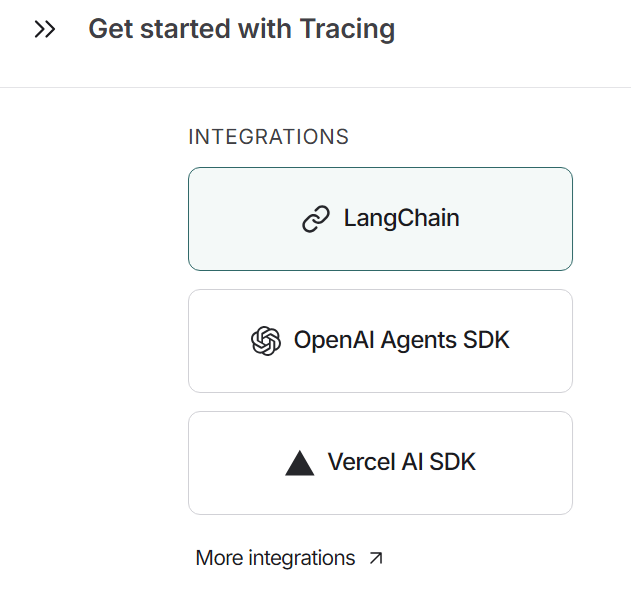
You should see the ability to “Generate an API key” and you should do that as you will need it to connect to the service.
You might see an instruction asking you to install the langchain-openai dependency. You don’t actually need that for these posts since we’re doing everything with local LLMs. However, if you were going to connect to OpenAI, then you should certainly install that dependency.
You’re going to see some export statements provided for you that allow you to configure your environment. Rather than use those as environment variables in your system, I recommend using them as part of an environment file in your project. To do that, let’s install one more dependency.
python -m pip install python-dotenv
This is just a library that will let us use the .env standard as part of our project.
Create an .env file in your project and in there put the following:
LANGSMITH_TRACING=true
LANGSMITH_ENDPOINT=https://api.smith.langchain.com
LANGSMITH_API_KEY={YOUR KEY}
LANGSMITH_PROJECT={YOUR-PROJECT-NAME}
Replace the {YOUR KEY} with whatever API key was generated for you. The web interface likely filled it in for you when you generated. Replace {YOUR-PROJECT-NAME} with whatever you want to call your project.
With this in place, all you need are two additions to your script:
|
1 2 3 4 5 6 7 8 |
from dotenv import load_dotenv from langchain_ollama import ChatOllama env = load_dotenv(".env") MODEL = "qwen3:latest" ... |
What this will do is make the environment variables accessible to the script. LangChain looks for those variables when it executes and, if it finds them, it will link up your local execution with the remote LangSmith service.
Run your script again. In the LangSmith web interface, you should see whatever you called your project show up in the “Tracing Projects” table.
You will likely see the count of your tracing projects go up but you won’t actually see the project itself until your script finishes running. You may have to do hard refresh.
You should see something like this:
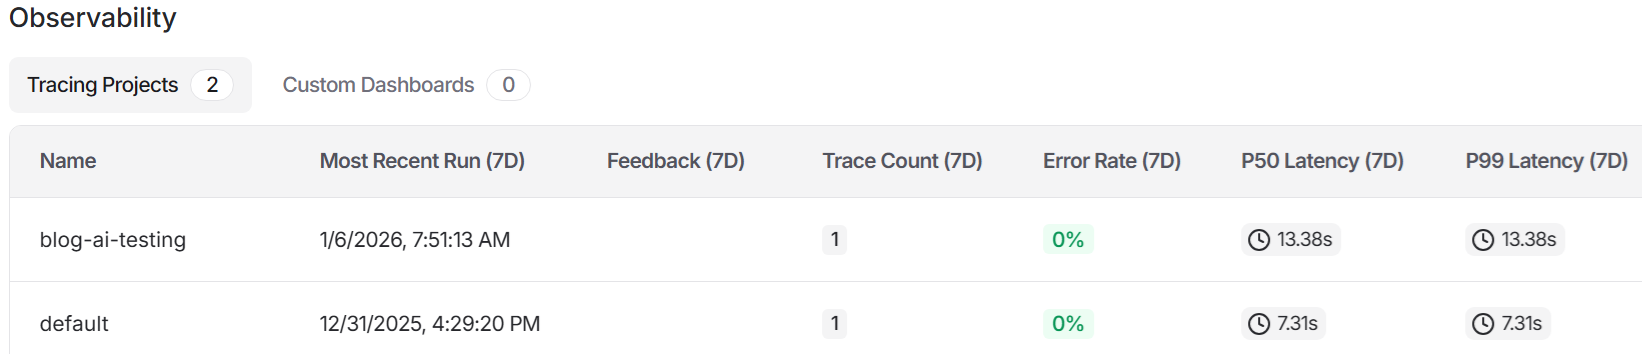
Here my project was named blog-ai-testing.
You can then click into that project and you can see the ChatOllama execution, with some metrics such as “Time to First Token” and “Total Tokens.”

This is essentially the metadata that we looked at before but with it all now passed into the LangSmith interface.
At a bare minimum, you can see that just by leveraging LangSmith you can more easily reason about your metrics, such as monitoring every request/response cycle with latency. That sounds like a performance quality to me!
What you have here is observability, in the form of traceability. That is yet another key attribute of testability.
In fact, controllability and observability are the two secondary quality attributes that enable the primary internal quality attribute of testability. I talked about these concepts a bit in my post on the spectrum of AI testing, although they apply outside of an AI context as well.
Getting Just the Content
Right now, we’re getting the full response that the model returns. That’s great if we always want to see the metadata along with the content. But you may just want to see the content, particularly if you’re using something like LangSmith to collate the metadata. The easiest way to do that is to change your last lines like this:
|
1 2 3 |
response = model.invoke(prompt).content print(response) |
Notice that I’m removing the print statement that shows you type. That was just for illustrative purposes. Here I’m just extracting the content and storing that in the response variable.
A Conversation (of Sorts)
Earlier, I said that ChatOllama is designed to work with chat messages but so far we just passed in a single string. Let’s consider a modification to the script.
|
1 2 3 4 5 6 7 8 9 10 11 12 13 14 15 16 17 18 19 20 21 22 23 24 25 26 |
from dotenv import load_dotenv from langchain_ollama import ChatOllama env = load_dotenv(".env") MODEL = "qwen3:latest" model = ChatOllama( model=MODEL, base_url="http://localhost:11434", temperature=0.2, top_k=25, ) messages = [ ("system", "Provide just the values to the human questions."), ("human", "What is the speed of light in a vacuum?"), ("ai", "299,792,458 m/s"), ("human", "What is the speed of light in water?"), ("ai", "225,000,000 m/s"), ("human", "What is the ratio between those values?") ] response = model.invoke(messages).content print(response) |
With this script, you now have a complete conversation history. There are three questions. For two of those questions, answers are already provided. So, when we invoke the model here with the messages array, we’re essentially asking the model: “Given this entire conversation that already happened, what should the AI say next?”
What about that third question, though? Well, that’s the “next” part from the AI’s perspective. If we didn’t have that open question, the AI would just see a conversation where two questions asked and answered. If you want to simulate a realistic multi-turn conversation where the next question builds on the first, you should only include the conversation up to the point where you want the AI to respond. What you should get out of this output is likely something like this:
1.3324
You will now see this added to your LangSmith entries as well:
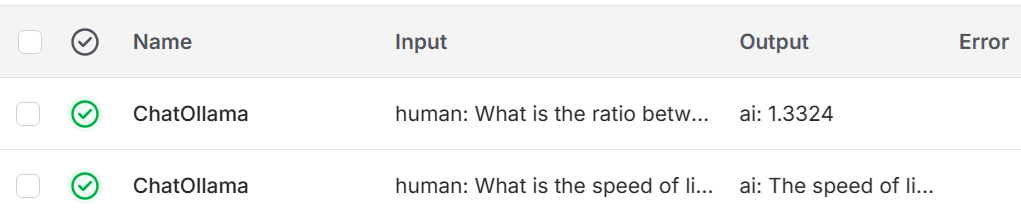
I’m going to revisit what’s happening here with “system”, “ai” and “human” in the next post. If you’re a tester reading this, just notice that with this relatively simple script, I showed you two distinct data conditions (simple string, message array) for a single test condition.
What Did We Do Here?
When you first start working with local LLMs through Ollama, the natural instinct is to keep things simple: send a string, get a response, move on. And for single, isolated questions, that works fine. That was what my first code example showed you. But there comes a moment where you need your model to do something more sophisticated: to remember what it just said, to build on previous answers, or to maintain a consistent behavior across multiple exchanges. Once you get to that point, you hit the limits of the simple approach.
That’s where structured message arrays come in, which was the second code example we looked at here. By organizing your interaction as a sequence of roles (system instructions, human queries, AI responses), you’re not just sending prompts. You’re building a conversation with memory. Look at the third question again. The model can now reference “those values” because it knows what “those” means. Similarly, the model can follow behavioral guidelines set at the system level (“provide just the values”) while responding to questions at the human level.
So, we’ve moved from shouting questions into the void and hoping for coherent answers to enabling the model to reason across multiple turns, maintain context, and function more like an actual collaborator than a magic eight ball. This isn’t just cleaner code. It’s the foundation for any AI application that needs to do real work.
Does a UI Help?
There are tools out there described as integrated local AI environments or simply local LLM user interfaces. These tools usually provide a unified graphical interface that orchestrates the necessary components for interacting with AI models entirely on a local machine.
Some people like to use OpenWeb-UI. However, I find this is very restrictive on Python versions. At the time I write this, they are currently “stuck” at version 3.11, although this is largely due to the Python ecosystem dependencies catching up. They also put a lot of emphasis on running via Docker. Which is fine but it’s an extra abstraction you have to worry about, particularly if you’re learning (or teaching!).
There are alternatives to this. Two good ones, that do have free offerings, are AnythingLLM and Msty. A common sentiment among many is that using AnythingLLM along with LM Studio is a really good option.
You really have to experiment and find what works for you. I personally find that, when learning, Msty focuses on a high-end user experience that bridges the gap between local privacy and cloud convenience. It’s sort of a polished daily driver. AnythingLLM is more specialized for Retrieval-Augmented Generation. LM Studio is really good for exploring different model architectures and fine-tuning hardware settings.
I’m not going to assume you’re using one of these tools for these posts simply because that would expand the amount of stuff I have to add a series of caveats for. However, I do encourage you to explore them if you feel they will make your life easier or make the learning process more enjoyable.
Do note, however, that these tools are about using the AI models, not about the coding aspects that I’m primarily looking at.
Next Steps!
Okay, this was a good start and hopefully a relatively gentle one. The next post is going to continue down this path, creating some more code so that we can dig further into the LangChain ecosystem.
